04 Auth
4.3 Badges & Proofs
In the last section, we tied together the three core concept of auth: roles, access rules, and badges. Then we applied those concepts to configuring resource auth. The key takeaway was that when we applied resource behaviors, we were assigned with pre-defined roles which we needed to configure. These pre-defined roles defined the boundaries between permissioned actions such as who was allowed to perform the resource action. Each role also had an accompanying
AccessRule which defined the requirements of accessing the role. These requirements came in the form of the badge(s) that needed to be present. There are special nuances to what kind of badge(s) are used as conditions of an AccessRule. This section will explore this concept more thoroughly.//Fungible Badges
We can use fungible resources as badges as they’re a simple and straightforward resource to satisfy an
AccessRule condition. Using fungible resources as a badge allows to provide a more generalized validation requirement as it doesn’t matter which fungible badge is present, so long as the it’s the fungible resource specified in the AccessRule.// Creating an authorization badge as a Fungible Resourcelet minter_badge = ResourceBuilder::new_fungible(OwnerRole::None) .divisibility(DIVISIBILITY_NONE) .mint_initial_supply(1);// Creating another Fungible Resource to be mintable by owner of admin_badgelet fun_tokens: Bucket = ResourceBuilder::new_fungible(OwnerRole::None) .mint_roles(mint_roles!( minter => rule!(require(minter_badge.resource_address())); minter_updater => rule!(deny_all); )) .mint_initial_supply(1000);- Line 3: We set divisibility to none to ensure that the
minter_badgecan not be fractionalized.
Here, we see that we create a
minter_badge for the purposes of using it for auth to mint fun_tokens. A tip worth noting is that if you are using fungible resources as a badge, it’s advisable that the fungible resource cannot be divisible as it simplifies requiring one whole supply of the resource to present as a badge, rather than a fractionalized badge.//Creating Non-Fungible Badges
Non-fungible resources can also be used as badges for authorization, which provides more precision for an
AccessRule condition as you can specify not only the non-fungible resource but the specific non-fungible unit as well. Therefore, even if someone else has a non-fungible unit of the same non-fungible resource, if it is not the specific condition required by the AccessRule, it can’t be used to satisfy the condition. Review Chapter 3.6: Non Fungible Tokens for more details how non-fungible resources work.// Creating an authorization badge as a Fungible Resourcelet minter_badge = ResourceBuilder::new_integer_non_fungible::<MinterBadgeData>(OwnerRole::None) .mint_initial_supply(vec![ // Mint a single badge (NonFungibleLocalId::integer(1), MinterBadgeData { name: "John" }) ]); // Creating another Fungible Resource to be mintable by admin_badgelet fun_tokens = ResourceBuilder::new_fungible(OwnerRole::None) .mint_roles(mint_roles!( minter => rule!(require(minter_badge.non_fungible().global_id())); minter_updater => rule!(deny_all); )) .mint_initial_supply(1000);//Fungible or Non-fungible Badges?
So badges can either be fungible or non-fungible resources. So, a question you might be asking yourself is: When is it appropriate to use a fungible resource or non-fungibles resource as a badge? As with most design questions, it depends on your use case. But here are some guidelines:
- If you need to specify granularity between the resources itself, use non-fungible resources.
- Non-fungible resources have both the
ResourceAddressand its unique ID (NonFungibleLocalId) for each individual non-fungibles. Together, it creates aNonFungibleGlobalIdwhich identifies the specific non-fungible unit derived from the non-fungible resource. If there needs to be distinction between the resource, non-fungibles will satisfy your need. - If you need to perform some kind of auth based on some condition(s) within the
NonFungibleData. For example, you may only allow access when some boolean field within aNonFungibleDatais true. - If you only care that the user has a particular badge without having to identify them separately, you should use a fungible badge instead.
- Fungible resources share the same
ResourceAddress. You may not care about distinction between the resources, but just whether they have that resource or not. For example, you may create a streaming service called Radflix and you only care that they have a Radflix badge to have access to your dApp.
//Using Badges for Auth
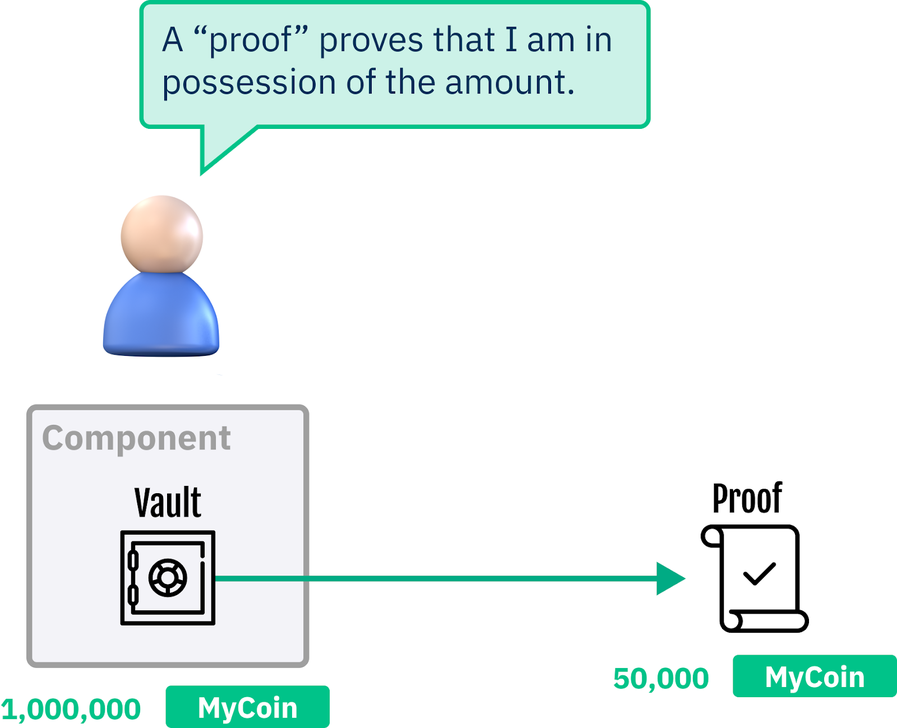
We’ve been talking about how badges are used for auth by the fact that it proves ownership that you have a particular badge. This is intuitive when we apply this concept in our everyday lives where if we travel between countries, we need a passport to identify ourselves. The form of badges are also prevalent in other parts of our lives and society such as law enforcement requiring to carry their form of badge to identify themselves and grant certain privileges. This makes asset-oriented design for smart contract design feel tangible and real. But unlike our everyday life where we must handover our passports to agencies for them to check the validity of it, we don’t actually need to physically send our badge(s) to a component to check for validity. Instead, proofs of badges are created and sent in its place. In real world metaphor, this is like flashing your passport in front of an agent instead of surrendering physical possession of it.
//Proofs
Proofs are a transient instance of a resource that can only exist within the duration of the transaction; unlike badges, proofs are actual Scrypto types that we can interact with programmatically. It is highly encouraged that when auth is required, we send proofs of badges instead of the physical badge itself. This is because assets on Scrypto have physical characteristics. When we send the physical badge to a component for auth, that badge is physically being transferred away from our possession to the component’s possession, effectively giving away our ownership of that badge. This can be dangerous because sending a badge to a malicious component effectively gives ownership of that badge and it may never be returned back to you!
//Try it Yourself!
Let’s open up a terminal and we can see how sending proofs work by following the steps below:
1. Use resim reset as a sanity check to clear out any potential history of the local simulator.
2. Create a new account by entering
1. Use resim reset as a sanity check to clear out any potential history of the local simulator.
2. Create a new account by entering
resim new-account
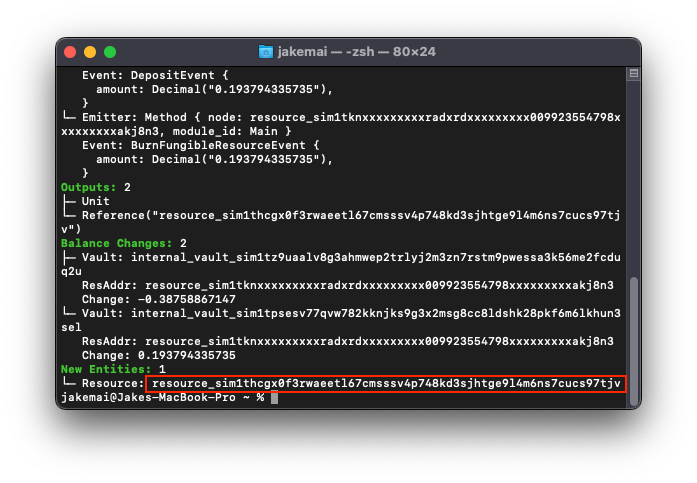
3. Notice that the output will return your Account component address, public key, private key, and a convenient owner badge for our use. We’ll be using this owner badge as a resource owner for a simple resource we’ll be creating in the next step.jakemai@Jakes-MacBook-Pro ~ % resim new-accountA new account has been created!Account component address: account_sim1c956qr3kxlgypxwst89j9yf24tjc7zxd4up38x37zr6q4jxdx9rhmaPublic key: 03488fa5a33888287a205f38785953e60f3b7d37608356af6113e2a98e915bbe81Private key: 50bcace298a287a22f6df31959b0324b55e997ab8d24e997cd0437f63b2c83f0Owner badge: resource_sim1nfzf2h73frult99zd060vfcml5kncq3mxpthusm9lkglvhsr0guahy:#1#Account configuration in complete. Will use the above account as default.4. Let’s use the resim new-token-mutable [owner badge] command to create a new mutable token and passing the owner badge address we received from Step 3 to use as a resource owner. We should be receiving the ResourceAddress of the token we just created from the output. We’ll be using this ResourceAddress to mint a supply of this token in the next step:
It is important to take the entire address including :#1#
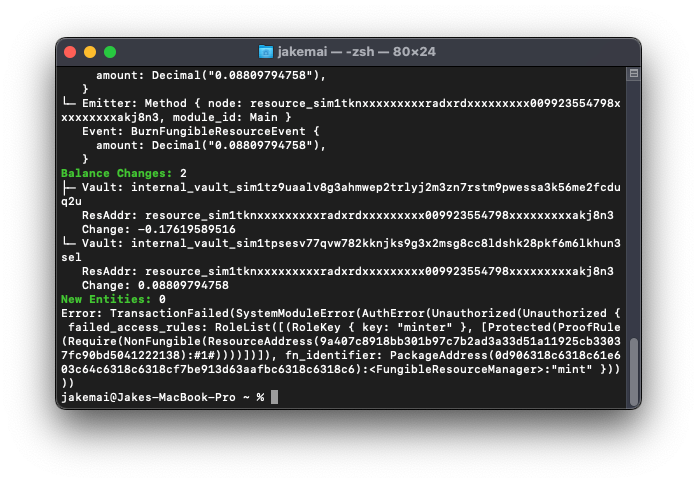
5. Let’s first use the ResourceAddress we received from step 4 and attempt to mint the token without passing a proof of our owner badge by passing the resim mint [amount] [resource_address] command:
6. However, if we pass the proof of our owner badge by using the command resim mint [amount] [resource_address] --proofs [owner_badge], we should receive a success!
7. We can review our account with the command resim show [account_address]
7. We can review our account with the command resim show [account_address]
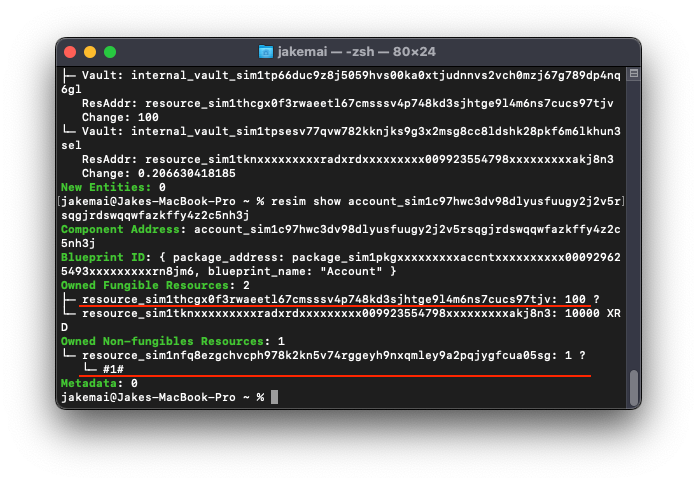
Notice that we received 100 supply of the token we created and that when we used the
--proofs flag in our command, resim is intelligent enough to send a proof of our owner badge instead of the badge itself; allowing us to still have possession of our badge.